Two lens or not two lens? That is the question

Hi all,

!! Please note this is a shameless cross post from expereiment.com I just want more input if possible!!

As I prototype the field dissection microscope I am facing some lens related questions, and more importantly lens related design decisions.

I have started off with things I had around the workshop from previous Openflexure prototyping:
image

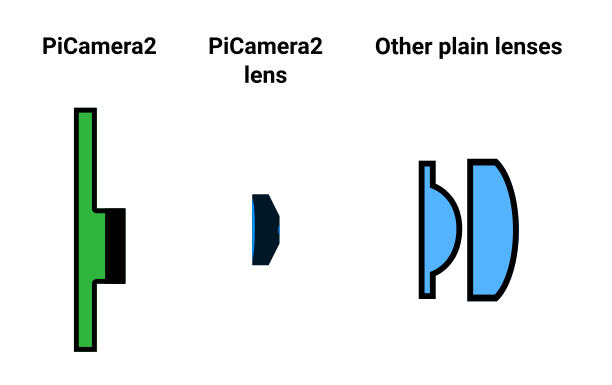
In the first version I simply unscrewed the PiCamera2 lens until it almost fell out. Then took an image.

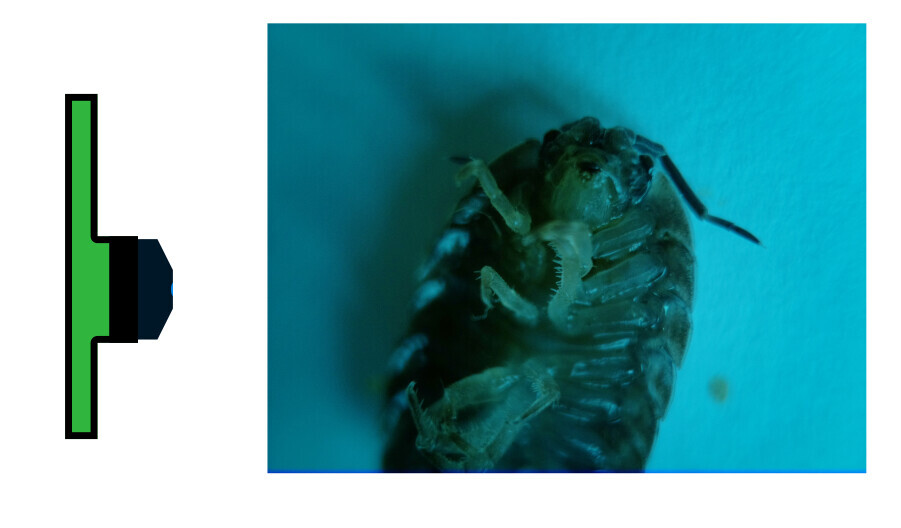
I think the magnification is about 0.25 between the woodlouse, and the image on the camera sensor. Now there are a few of problems here:

  1. Very hard to repeatable set the lens in the same position
  2. May need a bit more magnification in some systems
  3. Working distance is super short (~1cm or so), which is really annoying

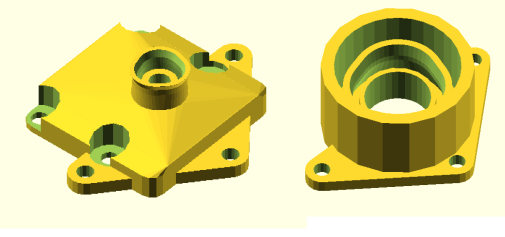
One thought is to make a system with a second lens. For this I make a modified super short lens spacer for the picamera lens, and a separate holder for another lens, these can be held apart by a little frame
image

The plan was to make a system with two lenses. As the camera sensor is smaller than the bug, we need to demaginfy the bug somewhat, to make a virtual image, that we then image with the picamera lens:

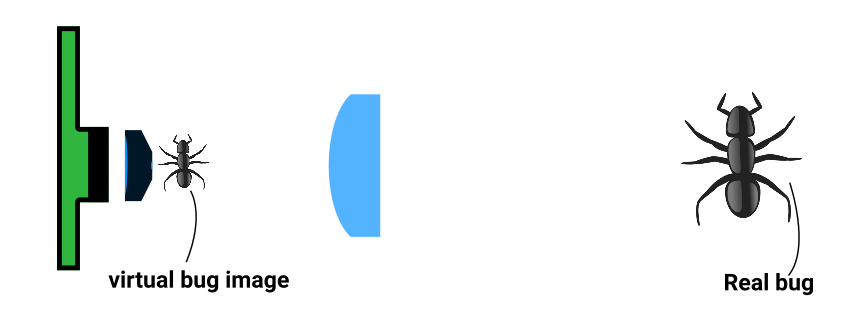
The eventual plan was to get “pancratic magnification” or adjustable zoom, my eventually modifying the system so that the picamera lens can be moved a few mm. I decided to start with the picamera lens about 6mm from the sensor giving it about a magnification of 1.

Starting with the 50mm tube lens from the OpenFlexure microscope I ended making a tube that spaced this lens about 75mm away from the pi lens. This gives a magnification of about 0.33, and a working distance of about 180mm. This working distance is huge, making the microscope super unwieldly (which we can’t have, we must be able to wield with ease!). I was able to see my woodlouse (well an new woodlouse, Woody the Second we shall call them). Though it was awkward enough I didn’t save a snapshot.

In desperation I also tried the 6mm focal length plastic lens from the OFM illumination. The lens to lens distance here needed to be really accurate, and without an adjusting mechanism I couldn’t really get a focus, but the lens is clearly awful so I didn’t proceed.

Where next?

Well this is the question!

First of all, I think the next stage for me should be to design a stand, tweak the mechanics some more, and write some docs. This way others can build something an have a play.

As for what is next for the optics, I would love some feedback. I am much more of an mechanics person than I am an optics person. So I am just assuming everything is a perfect thin lens. Which will only get me so far. I have some ideas, but there is a trade off on cost/openness/quality/availability. I am not sure which is most interesting for the community.

What do people think of these options:

  1. Find a plain lens with about 20mm focal length and try again. Both as a 1-lens and 2-lens system. My back of the envelope calculations tell me should give me a more sensible size and working distance.
  2. Get M12 lenses perhaps this kit. These are easier to adjust. However there is lots to think about here:
  3. The kit above seem to be six lens groups. If they are optimised for imaging long distance, will this make a rubbish microscope. How easy are these lenses to get, and can we get identical ones in a few years?
  4. I think single lenses are available in an M12 housing, but they are fairly expensive, and might perform even worse!?
  5. M12 mounts are available for lots of cameras. Allowing experimentation with PiCamera2, PiCameraHQ, and lots of other cameras
  6. Just get a cheap C-mount adjustable microscope lens and put in on a picamera HQ. The downside is the lens is now a black box, and this lens might be hard to buy in some locations. The up side is it should give me time to concentrate on nice mechanics.

All comments welcome!

Any thoughts @hikinghack @amchagas

3 Likes

Hi Julian,
Have you experimented with Google Lenses? These are really cheap, easy to buy everywhere and they have a focal distance of 45mm.
Let me know what you think. There are people at my University interested in these setup. I would be happy to replicate your experiments. I have a bunch of google lenses. I use them mostly for collimating LED light.

Pablo

2 Likes

I did consider them. I thought that if the 50mm focal length lens I had worked well I would look to move to the google cardboard lens. However, the focal length seems to make everything a bit too large to be nicely portable.

Any ideas of something equally cheap and available with a focal length of about 20mm?

just pinging @alex9000 for optics nerdery

speaking of those these are the ones @alex9000 got for his GOSH workshops, with a FL of 8mm

not sure if they will work for you

“M12 mounts are available for lots of cameras. Allowing experimentation with PiCamera2, PiCameraHQ, and lots of other cameras”

I like the idea of getting going with a standardized lens mount, even if it is a weirder M12 mount. My cursory looks seem like i can find an assortment of m12 lenses around pretty easily in lots of online places.

I guess this comes back to the broader key goals of this particular project, the goal is an open source dissection microscope, what are its main contributions vs just buying a dissection microscope?

  • For me one of the key aspects of a dissection microscope is that it is A) stereoscopic and B) decent working room right? so one can manipulate and pull out that fruitfly sperm or whatever a bit easier? This one is going to a digital display and likely won’t be stereoscopic (right? im guessing we aren’t hooking up to a 3d display hahahha)

(also neither regular dissecting microscopes or yours will scan XY like the openflexure? or do they?)

-The main downsides (i can see) are that they are
A) kinda expensive
B) a black box of parts
C) not too field repairable
D) Kinda awkward in size and weight for the field

So in trying to figure what to optimize for, if it is

A) just expense - then it seems like buying the $40 pi microscope C lens wouldn’t make that much sense since one can buy a stock digital dissecting microscope already for like $70-100 as is

and so then it would seem part of the goal would be to go super cheap and find cheap lenses to build around, but then even the cost of the pi and the camera are beyond the commercially available ones. So that wouldn’t make much sense if expense was the main thing we were trying to optimize for.

but if there are other goals and cool things we can do with a pi-powered microscope, (and optimize against weaknesses B-D) then maybe it makes sense to focus on those other things and just go with whatever lens gets you up and running quickest. Like if we have to order a pi anyway to make this thing work, ordering an extra $40 lens for it isn’t the worst if the whole thing is cooler than whats available?

(and please correct my overview of the goals if they are way off base)

Quick two cents:

The Arducam kits are a good idea I think. One of this modules was what we used on the FlyPi paper. Our experience was that for not so high magnification (so small stuff that you can still see by eye) they are not bad!

Back then, they only came with the kind of plugs that go into the RPi camera port, which was fine, but as you can imagine tied us to the RPi (not bad per se, but limiting, given global shortages, or even when we already had other hardware that could be used, but was not compatible with that camera interface).

Nowdays, I think a good approach would be to try to use a USB camera, mostly because than you can plug it into any computing hardware you have… Laptop fine, RPi fine, bananapi fine, beagleboard fine, etc… Than to control other hardware, like lights, motors, etc, you could just throw a 5 dollar microcontroller into the mix and your whole setup becomes more flexible?

ELP has a bunch of USB cameras too http://www.webcamerausb.com/ which might be worth having a look at? (same principle as Arducam ones).

hope this helps!

1 Like

I think this is a good place to start.

Yeah, so the non-digital ones are stereoscopic. We loose that being digital. I did think perhaps it is an inspection rather than a dissection microscope. But certainly the plan is a decent working distance.

No scanning, the open flexure is super slow at scanning as it is designed for 100x microscopy. You don’t need to scan to identify a bug.

Do thinking about the downsides is good. We need to do a lot more of this once we have prototype 1, but I think the conversation is easier to have when you are discussing a thing rather than an abstract idea.

My thoughts on this are:

Obsessions with parts cost hurt our community

Some things are unaffordable. We can’t spend many thousands of dollars on a brand new microscope. This is why we have a low-cost tools grant. Considering the affordability of an instrument is important and depends entirely on context. (I’ll discuss the USB microscope in a sec)

I generally stay out of the parts cost debates as it tends to create a race for the bottom where everything is a foldscope and nothing is actually functional enough to use. Cost is a really really complex business. What is the cost of the parts, the cost to your organisation/project to do the assembly, the cost to your organisation/project if the instrument is hard/slow/bad to use.

Taking an overall view of cost, it is important that the instrument actually works well and isn’t a huge time sink to use, assemble, and maintain. As such, prototyping something decent with what is in our labs is a good way to start. Once we have something that works we can understand the tradeoffs of moving to even lower cost parts, and whether that is worth it.

What about these USB microscopes on the market?

This is the big question. I think it is one that perhaps we haven’t as a project delved into enough.

In my experience, laboratories spend thousands on a Nikon or a Zeiss? Why? It works for their needs.

It has been about a decade since I bought a USB inspection microscope. In my experience it was really clunky to use. You couldn’t actually focus easily. The images were rubbish. The software to pull it off and save it were a huge pain. And the build quality made it feel like it would last a few weeks of use.

As it is a fully integrated final manufactured instrument. Changing any of that is really hard. Now if it turns out they have got much better and would be fit for purpose in the field for looking at orchid bees. Then we have made a huge mistake collecting this money. Because even if we make a camera with a $30 part cost. The time and effort to print and assemble it will always make up the $40 difference.

What is the value of an open microscope?

To me the value of an open microscope is the repairability, adaptability, and improvability.

We come in with prototype 1 and take to to the field. It will be similar quality (or worse) than the $70 USB microscope. You won’t win over a scientist who needs to get a job done by telling them that it is only $30 if they can’t get their work done.

If the $70 USB microscope “can’t do X” then probably we bin it, or donate it to a bored 12 year old. If our microscope “can’t do X” we make it do X, and we return. It is an ever evolving design, which can improve as we learn what breaks in the field, and can learn as we better understand user needs.

Also as new users come along with new weird and wonderful ideas, they have a starting place for their customisation. OpenFlexure was optimised for malaria diagnosis. But others have adapted it for super-resolution microscopy, for laser confocal scanning microscopy, for optical sectioning microscopy. This is because it is an open platform that was carefully developed and well documented.

If we make an open platform that is well developed and well documented then others can swap out for cheaper cameras, or swap out for crazy 3D monitors. The have a base microscope specifically designed to make it easy for them to adapt for their purpose. This is the value of open hardware.

If we start with the cheapest way to identify a single orchid bee, we create something that no one wants to actually use once they have proved the point once. This is why I disagreed so wholeheartedly when Experiment.com was pushing us towards the “hypothesis”. Good tools are about more than solving one problem once. They should be ongoing work that is never finished, that with each iteration provides more power and freedom to its user.

2 Likes

Cool! Well i agree then that you should just go with like the m12 arducam lenses for something decently easy to obtain that can get you cranking on the more fun parts of of the microscope quicker :slight_smile:

Or maybe even just the microscope lens if you want to go even quicker

And for potential use cases of things it could do, there’s other pi-based microscope projects like the Planktoscope (which is a much more zoomed in microscope), but makes me think of what we could do with an automated inspection microscope? Like hook it up to an ant farm tube and try to id each individual ant, etc…

:slight_smile:

In fact, this is exactly what we are doing at the https://stereo.ninja/ project. It’s a digital stereo microscope, we are using 2 Raspi cams (v2) with a Raspi (CM4 with a breakout board that has 2 camera inputs) and showing the image on a 3d monitor.

The intended application is soldering work and electronics inspection, so we do not need much magnification, but a large working distance. We use a 3d printed adapter on the v2 cameras to use M12 lenses. This works nicely for us, as there are many cheap M12 lenses available and the focus can easily be adjusted by hand. With the current lens, we have a working distance of ~15cm, which is very nice. The depth of field is around 1cm. It would be nicer to have a larger one, right now if you are handling objects manually (what you do at electronics inspection, e.g. tilting PCBs under the microscope) you get into the blurry zone easily. We are looking for better suited lenses, but we really need to test them, the cheap ones usually do not come with detailed specs.

Here’s a tutorial how to convert the v2 camera to a M12 thread:

Andreas

2 Likes

wow that’s soo cool!

1 Like

Also in the news today

Cheap microscope hacking

1 Like

Super cool!

How important is removing the glue and then reseating the sensor. I am just thinking in terms of things that put off people building the OpenFlexure. It seems like a step people would find scary. We never had much problem with camera tilt.

1 Like

It is an interesting thought. I think that needing an external laptop is a pain, having the option to use one is great. For now my plan is to use the OpenFlexure software as it is actively developed, has a growing community, has options for tagging images, and can connect to phones or laptops over wifi. This does limit us to the Pi for now, but there is work in the pipeline to allow it to be used with other computers and cameras.

USB cameras especially on small computers is there is a bit of a lag. Not a problem for automated imaging, but hell for manipulating something underneath by hand, or focussing by hand. With the pi and picamera we can connect the camera directly to the screen via the GPU which seriously cuts lag.

We did not evaluate how important this step is. To have a good 3D vision effect we reckoned to have identical (or as close as possible) optical properties on both cameras to be important, which could be spoiled by a tilt of the sensor.

But good point, did not think about that. But we are not that far, there are still more severe issues that could keep people from trying to replicate the device.

Here’s another similar project we can look at! That just released a pre-print and is aiming in the same direction

1 Like